
 หน้าแรก
 Latest images
modo 501 Feature Tour
5 posters
หน้า 1 จาก 1

 modo 501 Feature Tour
![]() by TonyWins Sun 09 Jan 2011, 01:19
by TonyWins Sun 09 Jan 2011, 01:19
ที่มา: www.luxology.com

modo 501 Feature Tour
Welcome to the modo 501 Feature Tour. Please join us as we highlight some of the exciting enhancements we have made to modo, relying extensively on images and videos to tell the story. Let’s start with an overview of rendering improvements that deliver markedly faster and cleaner results.
As Devindh Barbum put it, “Rendering in 501 is a great time saver. Even with modest hardware, users will immediately notice how quickly the engine resolves complex scenes.”
No texture warping
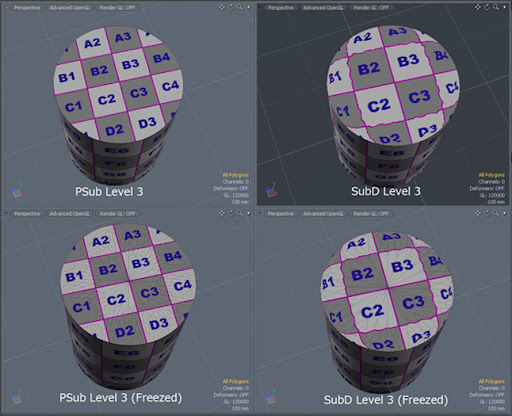
Pixar Subdivision Surfaces provide you with a number of advantages including no texture warping and support for boundary rules.

Pixar Subdivision Surfaces maintain UV textures more accurately than regular Subdivision Surfaces and will work on curved polygons.
polygon Subdivide command
The polygon Subdivide command optionally uses the same algorithm as the Pixar Subdivision Surface representation does for the SDS Subdiv command. This new method also maintains UV textures and will work on curve polygons.
FBX transfer of creasing info
Using FBX 2010.2 and the new Pixar Subdivision Surfaces, you can now exchange the semi-sharp crease data between modo and Maya.

“As a test, I exported a tire to Maya 2011 and it matches with modo perfectly. All of the edge weights are imported as well and are editable. This just perfects my modo to Maya pipeline. I’m so happy and will now do the dance of joy....done!” | – Wes McDermott

modo 501 Feature Tour
Welcome to the modo 501 Feature Tour. Please join us as we highlight some of the exciting enhancements we have made to modo, relying extensively on images and videos to tell the story. Let’s start with an overview of rendering improvements that deliver markedly faster and cleaner results.
As Devindh Barbum put it, “Rendering in 501 is a great time saver. Even with modest hardware, users will immediately notice how quickly the engine resolves complex scenes.”
No texture warping
Pixar Subdivision Surfaces provide you with a number of advantages including no texture warping and support for boundary rules.
Pixar Subdivision Surfaces maintain UV textures more accurately than regular Subdivision Surfaces and will work on curved polygons.
polygon Subdivide command
The polygon Subdivide command optionally uses the same algorithm as the Pixar Subdivision Surface representation does for the SDS Subdiv command. This new method also maintains UV textures and will work on curve polygons.
FBX transfer of creasing info
Using FBX 2010.2 and the new Pixar Subdivision Surfaces, you can now exchange the semi-sharp crease data between modo and Maya.

“As a test, I exported a tire to Maya 2011 and it matches with modo perfectly. All of the edge weights are imported as well and are editable. This just perfects my modo to Maya pipeline. I’m so happy and will now do the dance of joy....done!” | – Wes McDermott

TonyWins- User

-


จำนวนข้อความ : 2832
คะแนนความดี : 12840
ชื่อเสียง : 97
วันที่เข้าร่วม : 18/07/2009
อายุ : 51
ที่อยู่ : กรุงเทพฯ -


New Modeling Tools
![]() by TonyWins Sun 09 Jan 2011, 04:32
by TonyWins Sun 09 Jan 2011, 04:32
New Modeling Tools
Modeling has always been at the heart of modo and in addition to the inclusion of Pixar SubD’s to modo, we made many improvements to the core modeling capability of modo. In this part of the Tour, we review these great new modeling features, including significant snapping enhancements. Like C.E. Hayes says “Kiss your edgeloops goodbye.”
“1-Click” Add Loop
The new Add Loop tool is the interactive version of Loop Slice tool. Just click on an edge and you can see a pre-highlighted span to slice at the mouse position. This adds a “1-Click” edge loop creation capability to modo. Several options are provided in the tool, including distance and position indicators, splitting at the middle of the selected loop and creating new parallel loops. The new Preserve Curvature option lets the new position be calculated on a cubic curve to avoid flattening and thus maintain the curvature of the edge.
A demonstration of the new “1-Click” Add Loop modeling tool with preserve curvature option.
“1-Click” Add Point
The Add Point tool is introduced. This is another “1-Click” interactive tool to quickly add a vertex on the clicked edge. Ideal for adding a vertex on a curve or Bezier spline too.
A demonstration of new “1-Click” modeling tool called Add Point used in this example to refine the curvature of a length of cable which is rendered as a curve in modo 501.
Background constraint
The Edge Slide and Edge Extend tools now work with background geometry constraint. This is useful for re-topology modeling.
Demonstration of some of the new re-topology tools in modo 501 (Edge Extend and Edge Slide) which now respect a background constraint.
“Between” option for arrays
The Linear and Radial Array generators now include a new “Between” option which establishes positions between the start and the end handles. This is useful when you want to align trees, buildings, fence posts or other objects with consistent distances between them.
A demonstration of how modo 501 gives you more control over cloning objects between two points.
Align Vertices
Align Vertices is a command to align the selected vertices along the given axis or on the plane between the first selected vertex and the last selected one. This command requires three or more selected vertices and will align them by axis or on a uniform basis.
A demonstration of new options in modo 501 for precisely lining up vertices. The Align Vertices tool is shown and then the existing Set Position tool is demonstrated, as it now optionally respects the workplane
Diagonal Edge select
Diagonal Edge selection mode is introduced. modo can now automatically select edges which are shared by pairs of triangles. You can convert triangles to quadrangles by deleting the selected edges.
A quick demonstration of using the new Diagonal Edge selection in modo 501 to convert triangles to quad polygons.
Smoothing groups
Smoothing Groups are introduced. Smoothing groups allow you to define specific areas for polygon smoothing in game engines and providing better control over vertex normal shading when making game characters.
Here we create a hairline on a low poly model using the new Smoothing Groups capability in modo 501.
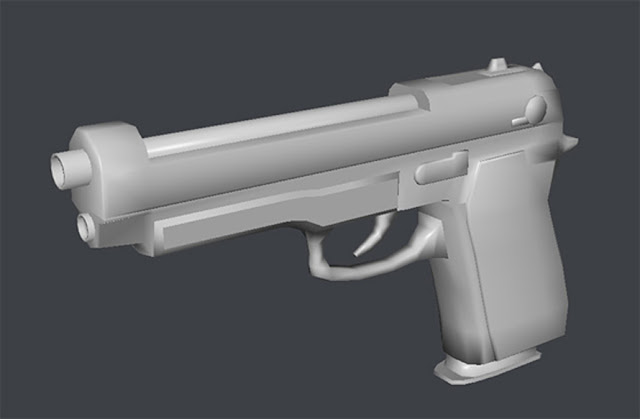
Gun rendering by Philip Lawson illustrates how modo 501 Smoothing Groups allow users to define specific areas for polygon smoothing in game engines and providing better control over vertex normal shading when making game characters.
Tablet control in Mesh Paint
New tablet controls allow you to control the position and rotation of mesh paint elements using the angle of the pen on the tablet’s surface. The new rotation modes are:
● “Surface Align with tablet (no pitch)” aligns to the surface using the tablet heading but no pitch.
● “Screen align” aligns the mesh using the screen direction.
“Drop” paint mode
The new “Drop” paint mode in the Mesh Paint tool lets you place a mesh while controlling the rotation and size at the same time (like the preset brush). Using the “ctrl” key qualifier in slide mode adjusts the size – providing additional control when placing elements.
Here we quickly create a small orchard using modo 501’s new capability to place, scale and rotate objects when using Mesh Paint.
Visualizing UV distortion
Visualizing UV distortion in 3D space is now easier. The UV view can now show the distortion of UV polygons against 3D polygons as RGB colors and you can display this as a vertex color map in a 3D view as well.
This video presents news ways to visualize UV distortion in modo 501.

In this video talk by Brad Peebler, he explains how modo 501 addresses the “little things that matter to modelers.” Topics include UV Distortion visualization tools, Vertex Align, Set Position now supports Workplane, Loop Slice option to Preserve Curvature, Add Loop tool, Add Point tool, Linear Falloff with new Symmetric Option, new Mesh Paint “Drop” mode with “Source” supports “painting” meshes, presets and replicas into a scene for rapid modeling, Edge Slide and Edge Extend now support Background Object Constraints.
Snapping Popover
A new snapping popover activated by the F11 key provides ready access to the current snapping state, and also shows settings for snapping and constraint tools. You can also toggle snapping on or off from this popover. The tool attributes for snapping for the Pen and Mirror tools have been moved to the popover.
Here we show some of the improved snapping workflows in modo 501, including the ability to have a default snapping behavior.
Snap Toggle
A new Snap toggle (button) is provided in the user interface which enables snapping behaviors, depending on the situation. The Snap toggle key is assigned to the global ‘X’ key. In any idle time, pushing the Snap key simply toggles the global snapping state.
Temporary Snap Control
By using LMB + the Snap toggle, the snapping state is temporarily changed while the LMB is down. The state comes back again as soon as the mouse button is released. This ability to temporarily enable snapping saves several mouse clicks over the old method, streamlining workflow.
Snap to a plane or the axis
The Geometry Snap mode in modo 501 is improved to snap to a plane or the axis of vertex position when you drag the constraint axis handle or plane handle.
Fixed Snap option
Fixed Snap is a toggle in Geometry Snap that lets you jump elements between all snap-able positions.
A video showing how to snap elements with greater speed and accuracy using the Fixed Snap option in modo 501.
1D Snapping
When you drag a transform handle, you now have 1D snapping to background elements.
This video demonstrates the ability to move an element along a single axis and snap to elements in a background object that are perpendicular to the axis of movement.
TonyWins- User
-
จำนวนข้อความ : 2832
คะแนนความดี : 12840
ชื่อเสียง : 97
วันที่เข้าร่วม : 18/07/2009
อายุ : 51
ที่อยู่ : กรุงเทพฯ -
Replicators
![]() by TonyWins Sun 09 Jan 2011, 05:05
by TonyWins Sun 09 Jan 2011, 05:05

Replicators
One of the things modo is super good at is creating scenes with stunning amounts of detail with a minimum of fuss. In modo 501, we cranked up the power of our Replicator functionality to provide more control and even time-varying appearances.
Freeze Surface
With the new Freeze Surface Generator, you can now convert a surface generator into a point cloud which gives you individual control over replicator/instance items by letting you edit the individual vertices.
A demonstration of how modo 501 lets you manually control over the location of instances via the Freeze Surface option.

OK, this was done in modo 401 but we just love this image.
Freeze Replicas
With the new Freeze Replicator command, you can now convert replicas into instances. This allows you to edit them or export them to other software.
This video quickly demonstrates modo 501’s new ability to let you scale or keyframe replicas by turning them into instances.
Ignore Deformations
Surface generators have a new “Ignore Deformations” option. This allows the replicas to “stick” on animated deformations. You can use this to make leaves “float” on an undulating lake surface for example.
Example of using the Ignore Deformations option.
A new way to create an apple!
Vary Appearance over Time
Replicators have a Time Offset and Time Variation parameters for random variations. This affects the transform and visibility of replicated child items. This lets you vary the basic appearance of replicas over time, which can be useful in medical or scientific visualizations for example.
Here’s an example of an animation using the Random time variation setting. It is a single animated model with a diffusion animation on it. The model was parented to an empty mesh and a regular plane was used as the point source for the replicator. Look carefully and you will see some items stop for a couple of frames while the rest are still jitterbugging.
TonyWins- User
-
จำนวนข้อความ : 2832
คะแนนความดี : 12840
ชื่อเสียง : 97
วันที่เข้าร่วม : 18/07/2009
อายุ : 51
ที่อยู่ : กรุงเทพฯ -
Multi-Res Sculpting
![]() by TonyWins Sun 09 Jan 2011, 07:27
by TonyWins Sun 09 Jan 2011, 07:27
Multi-Res Sculpting
With the addition of Pixar Subdivision surfaces, we now have true multi-resolution sculpting within modo. And of course sculpting works right alongside modo’s traditional modeling tools (and the renderer!). Simply put, sculpting has had a major overhaul in modo 501.
Robin Konieczny said “For me the Pixar SubD’s are worth the whole upgrade price; having the peace of mind that what I see in modo will be the same as in Maya is such a gift and the creasing seems to work great.”

Animation of modo 501 UI showing progression of a head sculpture, created by Zoltan Korcsok, which takes advantage of Multi-Res sculpting levels.
Sculpting workflow
Multi-res sculpting
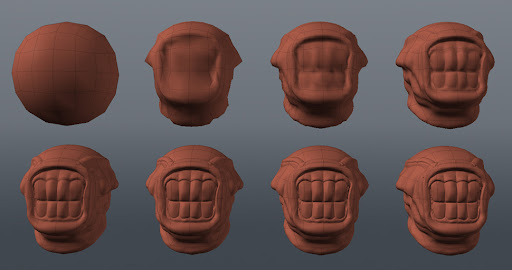
Multi-Res sculpting is now supported in modo 501. This utilizes the newly introduced Pixar Subdivision Surface type of geometry. You can sculpt on any subdivision level to make gross shape adjustments while preserving fine detail you added earlier at a finer subdivision level. This also lets you add extremely fine detail without having to explicitly add more geometry in detailed areas.

This image by Lukasz Pazera illustrates modo 501’s new Multi-Res sculpting. Now you can sculpt fine details without having to explicitly add more geometry.

Multi-Res sculpting in modo 501 allows you to sculpt on any subdivision level to make gross shape adjustments while preserving fine detail you added earlier at a finer subdivision level.

Still image rendering of soldier by Peter Eriksson illustrates fine detail achieved via modo 501’s more flexible and powerful sculpting tools.
Video version of Peter Eriksson’s soldier. The first pass is rendered directly with modo 501. The second pass has an Adobe After Effects motion blur filter applied.
Improved stroke engine
Sculpting in modo 501 benefits from an improved stroke engine that provides less lag and greater speed
Shows multi-res sculpting in modo 501 with tools like flatten, carve, tangent pinch and the push tool with image ink. The new RayGL viewport option is used to enable subsurface scattering rendering in the viewport for a wax-like effect.
Stroke interpolation options
New stroke interpolation options offer greater control as you sculpt in modo 501:
● Step Size: This controls the distance between each consecutive brush position. Smaller values mean smoother strokes.
● Continuous Stroke: connects each consecutive brush position, making the stroke continuous.
● Draw Stroke: draws the stroke as a yellow line in the OpenGL view, to help visualize the stroke.
Lock borders
The Lock borders option when sculpting will essentially freeze the positions of any border areas (i.e. open edges) so brushes can’t affect them. When sculpting, it lets you relax a shape without changing its borders. This is useful when working on say, a landscape, that needs to fit into another area and you need the edges to remain in the original position so they can be welded together.

Sculpting in modo 501 allows you to lock down the edges of an area as you sculpt. For example, you can relax a shape using a brush without changing the shape of its borders.
Smooth mode
You can now invoke a Smooth Mode and apply smoothing during sculpting operations at will. This is very useful when using sculpting tools like Flatten.
Demonstration of using pressure to control smoothing in the middle of a sculpting stroke.
Sculpt on top of other geometry
Sculpting now supports use of a background Constraint.
Sculpt in UV view
Sculpting is now supported in the UV view. Sculpt tools in the UV view gives a very natural way to work on UVs: you can push, pull and smooth them just like you would do on a regular mesh with sculpt tools. Perfect for relaxing or tweaking your UVs.
This video shows using modo 501’s sculpting tools to smooth UV's. The Lock Borders option lets you smooth internally without affecting the boundaries.

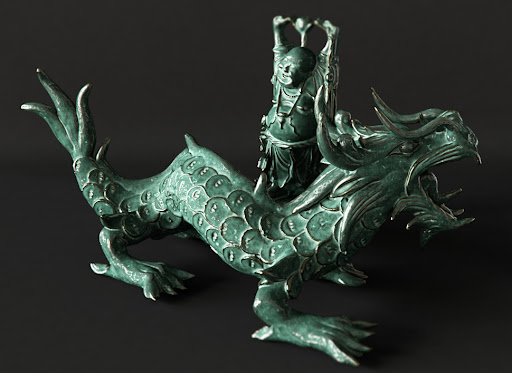
Slug sculpted in modo 501 by Andy Brown.
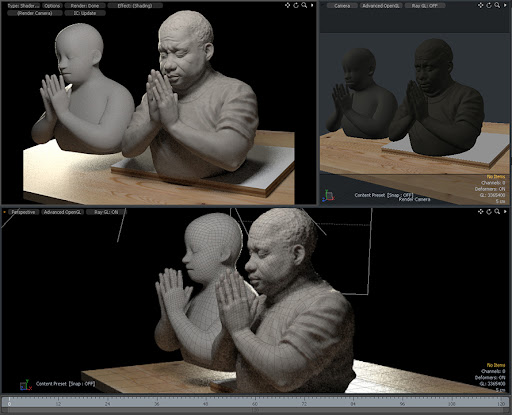
Figure sculpture by Jacques Defontaine shown inside the modo 501 user interface.
TonyWins- User
-
จำนวนข้อความ : 2832
คะแนนความดี : 12840
ชื่อเสียง : 97
วันที่เข้าร่วม : 18/07/2009
อายุ : 51
ที่อยู่ : กรุงเทพฯ -
Fur / Hair Enhancements
![]() by TonyWins Sun 09 Jan 2011, 07:47
by TonyWins Sun 09 Jan 2011, 07:47

Fur / Hair Enhancements
Fur in modo is a bit of a misnomer, as you can create so many different looks with it. In modo 501 we increased the control you have over fur, extended use of Fur for things like forests and leaves and reduced memory usage at the rendering stage. Below we show some of the new 501 Fur features and also present some basic movies that provide a nice general overview of Fur in modo 501.
An overview of working with Fur in modo 501.
Fur Quality
Kink
The Fur Material now offers Kink options. This applies a Perlin noise to the root or tip of a fur strand to change the root direction smoothly. You have control over Scale and Offset parameters.
Frizz
The Fur Material now offers Frizz options. This applies a Perlin noise to the root or tip of a fur strand to change the hair direction at each node. You have control over Scale and Offset parameters.

Jacques Defontaine used Fur in modo 501 on this character WIP.

Hair on this expressive figure by Jason Bickerstaff was created using modo 501’s new Fur options.

The Fur Material now offers Kink and Frizz options, as illustrated in this demonstration image by Chris Golchert.
In this animation by Chris Golchert, you can see the wide variety of different styling effects that result from simply by changing some of the new Fur options in modo 501 over time.
Overview of new Kink and Frizz options for Fur in modo 501.
Billboards
You can now use two types of Billboard polygons in the Fur material, as a way to distribute flat polygons across a surface. The Tree option replaces each fiber with a flat, upright simple polygon plane that always faces the current render camera. The Leaves option replaces each fiber with a flat simple polygon plane. Billboards are useful for mapping tree images to upright planes scattered on a landscape to create a forest, or for adding leaf images to a tree branch, for example.
This video focuses on how to shade Fur in modo 501. The new Billboard option is covered in this demo as well.
Speed
Frustum Culling
View Frustum Culling is a new Fur Material parameter that directs modo to disregard Fur outside the camera view. This results in faster fur generation time and reduced memory usage. It is mostly useful on large landscapes covered with grass.
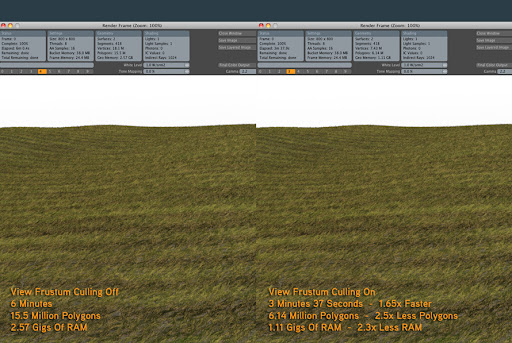
Before modo 501, Fur generation calculations included Fur outside the camera view. This resulted in slower Fur generation time and reduced memory usage. In modo 501, a new Fur Material parameter called “View Frustum Culling” speeds up calculations and uses less memory.
Styling
Tip mode
Hair sculpting ‘Tip mode’ is introduced in modo 501. Tip mode makes the tool work with maximum strength on the tip and reduces the effect on the root. This provides a more natural feel.
Stray hairs
Fur Strays can now be generated. Strays are individual hairs that escape and protrude from Clumps. You can set their percentage probability and their Strength – which affects how far from the clump they diverge.
This video covers the basics of controlling or styling Fur shape (including Fur Strays) in modo 501.
Alternate Guide source
Fur Guides in modo 501 can now be specified by item and polygon tag. This makes it possible to separate the Guides from the surface on which hairs are grown, so you could have a mesh with just the Guides controlling the hairs grown on another mesh. You can also tag the Guides for each Fur layer which should allow more sophisticated hair styling.
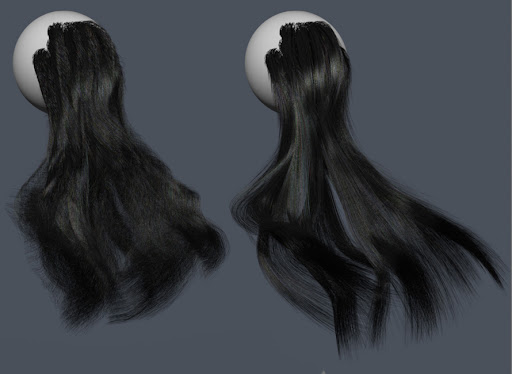
This pair of modo 501 renderings by Chris Golchert illustrates fur (hair) with some kink on the left and without kink on the right.
OpenGL Guide display
OpenGL Fur now works with Guides.
Explanation of how to grow hair on a model using modo 501’s Fur tools then how to comb the hair using a brush to style it.
Set OpenGL Color
Set OpenGL Color: overrides the OpenGL color using the specified color, this can useful when working with Guides to distinguish them visually from the OpenGL Fur representation.
Texturing improvement
Fur textures are now evaluated at each point along the hair, making it possible to change clumping along the length for example.
Preview can disable Fur
Preview now has options to disable Fur and to reduce the Fur density in Preview. This is great for maintaining performance in the Preview Renderer when working with vast amounts of grass, hair or other kinds of Fur.
แก้ไขล่าสุดโดย C-Gru เมื่อ Sun 09 Jan 2011, 08:05, ทั้งหมด 1 ครั้ง
TonyWins- User
-
จำนวนข้อความ : 2832
คะแนนความดี : 12840
ชื่อเสียง : 97
วันที่เข้าร่วม : 18/07/2009
อายุ : 51
ที่อยู่ : กรุงเทพฯ -
Animation Rigging and Assemblies
![]() by TonyWins Sun 09 Jan 2011, 08:05
by TonyWins Sun 09 Jan 2011, 08:05

Animation Rigging and Assemblies
Upon every release of modo we add more to the foundation of modo’s animation capabilities and modo 501 provides an important new capability: the ability to create re-usable rigs using a visual connection editor.
Rigging
Schematic view
The new Schematic viewport in modo 501 provides a canvas on which you can construct and view complex animation relationships (rigs). To add the necessary elements to the schematic view, users can drag any item from the 3D viewport, Item List, etc. and drop it in directly. Then you can link elements, including constraints and modifiers, with visible connections. This provides an intuitive and powerful way to build rigs and animated scenes.

The new Schematic viewport in modo 501 provides a canvas on which you can construct and view complex animation relationships (rigs) as shown in this screen capture.
A simple introduction to linking objects’ channels to one another in the new Schematic View in modo 501.
Create Assemblies
Assembly Groups and Sub Assembly groups are introduced. Assemblies can now be instanced and mirrored. An ‘Expose External Channels’ option for Sub-groups will create channels on the new group for each channel link within the group. This is useful for creating assemblies that can be re-used elsewhere; a kind of ‘black box’ that can be connected up without knowing about the internals.
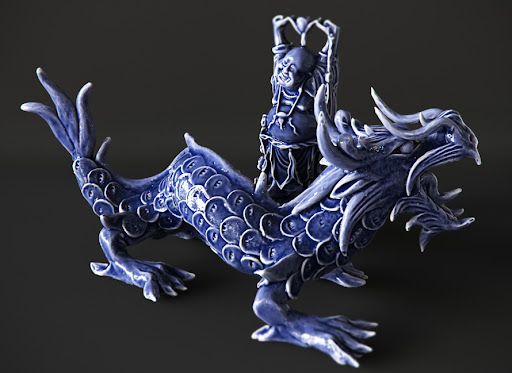
The new Schematic View in modo 501 is used to create a moderately complex rig that uses Assembly Groups for six legs of an insect.
New Channel modifiers
Channel Modifier additions include:
● Trigonometry: Functions for sin, cos, tan and their inverses.
● Vector: Creation of vectors, setting their length and normalizing Vector.
● Math: Math operations or vectors including add, subtract, cross product and dot product.
● Conditional: Provides logic operations (e.g. A is less than B) to be performed on the input channels with the option to define the output when the result is true or false.
● Simple Kinematics Channel Modifier is provided this applies a speed and constant acceleration to a channel at a given time and position. The main use for this is to produce a physically based trajectory for something flying/falling through the air in gravity (much like the old gravity modifier, but without bounces).
User interface
Playback speed
Animation playback speed is optimized on multi-core machines, resulting in up to 2X speedup for some scenes.
Reverse playback
modo now supports reverse playback of animation.
TonyWins- User
-
จำนวนข้อความ : 2832
คะแนนความดี : 12840
ชื่อเสียง : 97
วันที่เข้าร่วม : 18/07/2009
อายุ : 51
ที่อยู่ : กรุงเทพฯ -
Improved Workflow and UI
![]() by TonyWins Sun 09 Jan 2011, 08:18
by TonyWins Sun 09 Jan 2011, 08:18

Improved Workflow and UI
Details matter, especially when many of us spend multiple hours per day in front of modo. New to 501 is a major improvement to the documentation – and a new online system for continually improving it with the help of the modo community. To improve workflow in 501 we dived into everything from the color picker to adding a ray-traced mode (RayGL) in the viewports. Check out the new Tool Stacks.
As Chris Hague put it “All of the little tweaks make for less headaches, and really let you get back to the fun of 3D.”
New inline help and documentation
The online documentation system has been extensively revised for modo 501 to make it easier to find the information you need, quickly and efficiently. Content has been rewritten to be easier to understand, while retaining the more technical info of the older version. Many new videos are provided. The information on how to use modo is now easier to navigate and it is easier to discover related information. The search function has been overhauled and it’s now more robust. Lastly, there is a community-based commenting and rating system.
James Darknell of Luxology explains the extensive improvements made to the documentation in modo 501 in terms of both content and accessibility. He also explains how the modo documentation is now “live” and online, so that the modo community can comment on and rate the documentation going forward.
RayGL™
With the new RayGL™ viewport rendering mode you can see a ray-traced view of your scene in any OpenGL viewport, using any projection. This is a ‘live’ view that enables you to model or sculpt on an object while seeing the result in near final rendered quality. Numerous system preferences are exposed that let you define the style of updating, quality level and what specific visual effects (e.g. refractions) you wish to see in the viewport.
With the new RayGL™ viewport rendering mode you can see a ray-traced view of your scene in any OpenGL viewport, using any projection. This is a “live” view that enables you to model or sculpt on an object while seeing the result in near final rendered quality.
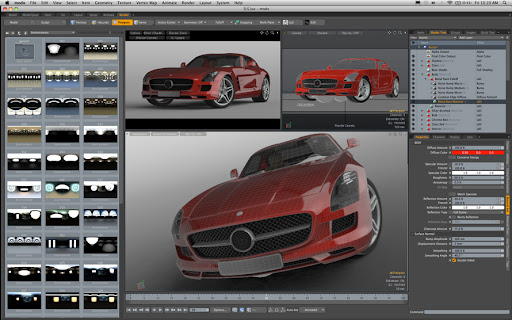
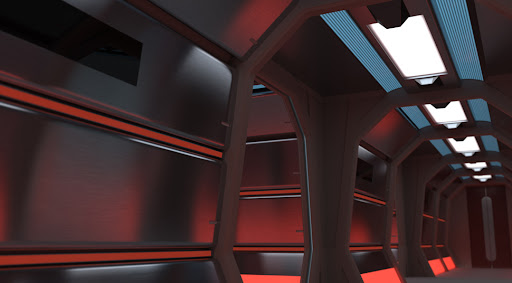
In this car example, you can see how the new RayGL™ viewport rendering mode helps you visualise the ray-traced view of your scene. It updates as you move, model or sculpt objects in your scene while maintaining near final rendered quality.
With the new RayGL(tm) viewport rendering mode you can see a ray-traced view of your scene in any OpenGL viewport. Numerous system preferences are exposed that let you define the style of updating, quality level and what specific visual effects (e.g. refractions) you wish to see in the viewport.
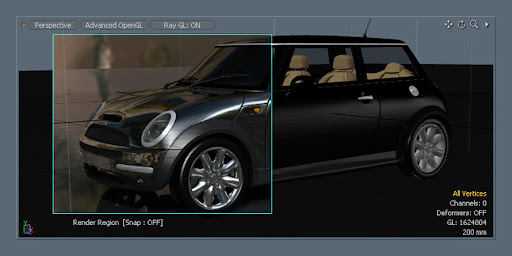
Render Region
The Render Region Tool in modo 501 lets you specify an area in an OpenGL view that is to be rendered. This enables the Render Region option interactively in the OpenGL view. Thus, you can transform the region and see the result in Preview for example. This is useful to concentrate updates to only specific areas which will update faster, giving more rapid feedback for complex scenes.
The Render Region tool makes it easy to constrain Preview or final Render to a subset of the scene that you care about most.
Shader inspector
An improved Shader Inspector in the Preview Renderer is provided. It shows the evaluated value for each shader layer under the mouse along with the effect name. It also displays the light intensities reaching the point under the mouse: from global illumination and also from each light.
The Shader Inspector provides a convenient way to debug or evaluate the light and material contributions to any pixel in the Preview Renderer.
Reflection modo OpenGL improvement
There is a new customer-provided image for the default environment for the reflection shading mode in OpenGL for modo 501.
mera example illustrates new default environment for real-time OpenGL reflection shading mode inside modo 501 viewports.
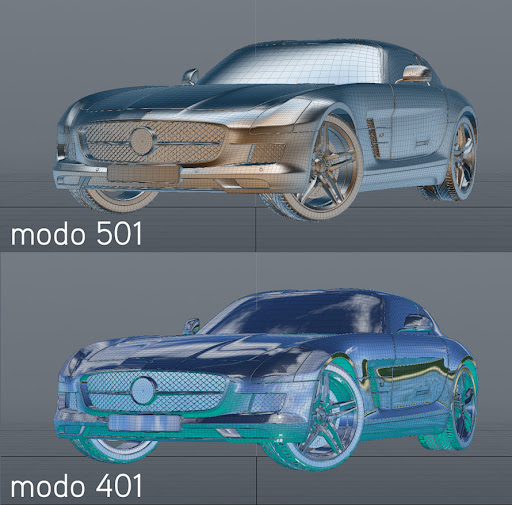
Comparison between OpenGL reflection shading mode in modo 501 versus the earlier modo 401 implementation.
Preview Current layer
In the Preview Renderer, you now have a mechanism to easily see the impact of a single Shader Tree layer. The ‘Effect’ button will allow you to disable and enable a ‘Current Layer Overlay’ function which will (if enabled) display the currently selected Shader Tree layer as an overlay on the rendered image and display the raw value unaffected by things like blending mode, opacity or shading. So if you have a map on the subsurface color channel, it will display the raw color of the map. For groups, the pop-up will display the group mask opacity. This is very handy to debug texturing and see what is affecting what in your rendered image.
Customizable color picking
A new Color Picker is added with HDR support and extensible color models (via the modo Plug-in SDK). The new color picker is customize-able and lets you set the way the color space is displayed so that it matches your workflow.
In modo 501, a new Color Picker is added with HDR support and extensible color models (via the modo Plug-in SDK). The new color picker is customize-able and lets you set the way the color space is displayed so that it matches your workflow.
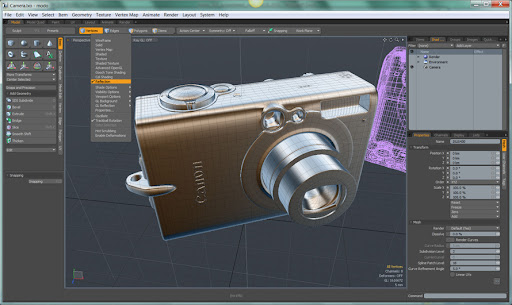
Camera locking and view indicator
There is a new Camera View Heads Up Display that is shown in the viewport when you have a locked camera and it is the Render Camera.
Render setting presets
You can make item presets for your render settings in modo 501. If you include a camera in the selection while making the preset, it will be included in the preset and added to the scene upon application. This is handy for setting up standard renderings that you want to perform on a scene repeatedly – for design review by others for example.
Photometric Light shape preview
Photometric Light shape preview is introduced. When you apply an IES light profile you can see a wireframe representation of the profile in OpenGL. A displaced wireframe sphere is drawn at the light position with its radius based on the intensity of the associated photometric data file (IES or EULUMDAT). You can adjust the size by adjusting the light’s display size.
New stereo camera move controls
New stereo camera move controls are provided as stereoscopic handles on Camera Transforms. You can now interactively set the convergence distance, which specifies where the ‘screen’ is in the 3D space, with things closer to the camera than that distance apparently coming out of the screen, and more distant objects appear to be going into the screen. There two new handles when using the move tool on a stereo camera. One handle lets you adjust the convergence distance, by moving a virtual screen plane back and forth in the frustum, the other is the “parallax offset probe.”
This movie shows workflow enhancements and new export options for stereoscopic rendering in modo 501
Parallax offset probe
A new “Parallax offset probe” option in a stereo-enabled camera lets you measure the parallax offset at any point in your scene. The reported values can help you in calculate the ‘stereo budget’ of the shot, which is the total amount of parallax offset between the foreground and background. You can move the camera around your scene to see the parallax offset at any point.
COLLADA options
COLLADA Export Scene I/O options are now displayed in System Preferences.

COLLADA Export Scene I/O options are now displayed in System Preferences.
Tool Stacks
Tool Stacks are introduced. These let you set the default Action Center, Action Axis, Brush, and Snap behavior that you prefer. For example, if you specify that Grid Snapping is on by default, the Pen Tool is used, Grid Snapping will be turned on if you toggle on the Snapping state.
Here we demonstrate how Tool Stacks provide even more control over how individual tools operate.
TonyWins- User
-
จำนวนข้อความ : 2832
คะแนนความดี : 12840
ชื่อเสียง : 97
วันที่เข้าร่วม : 18/07/2009
อายุ : 51
ที่อยู่ : กรุงเทพฯ -
New Content Included
![]() by TonyWins Sun 09 Jan 2011, 08:43
by TonyWins Sun 09 Jan 2011, 08:43
New Content Included
modo now comes packed with even more Presets and content of all kinds – many of which were directly contributed by our beta testers. Many new content sample scenes are provided, ranging from simple scenes to help get you up to speed with 501 new features to more detailed scenes that show off advanced rigging and rendering features. Over 60 brush presets are provided along with material presets designed especially for use while sculpting.
Scene files, presets, textures and more
In addition to the new material textures shown earlier, many new scene files and presets are provided in modo 501, including: brushes, meshes, rigs, materials – even a handy set of monster teeth! Much of this new content is designed to specifically use or demonstrate the use of new modo features and workflows. Almost all of it comes from the beta testing team who helped test modo 501.
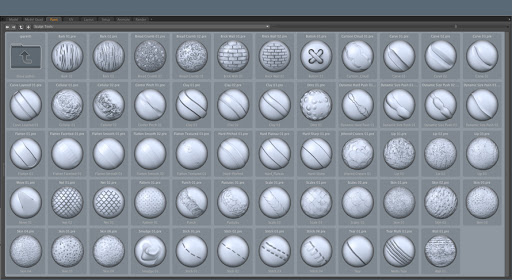
New presets and materials are supplied specifically to assist in sculpting.
Enhance:modo Textures
A large set of Enhance:modo Textures are provided. This is an extensive library which includes geometric textures, plus organic, noise, panel, process, skin, space tile, water and even display counter textures like a 24-hour clock. There’s 149 in all!
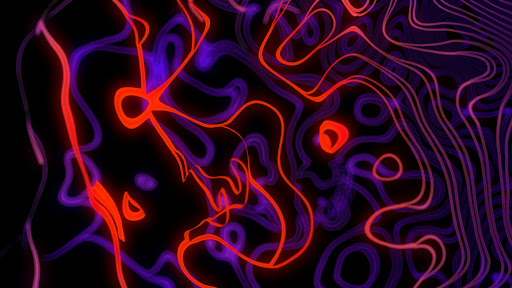
Some of these new textures are spacey.
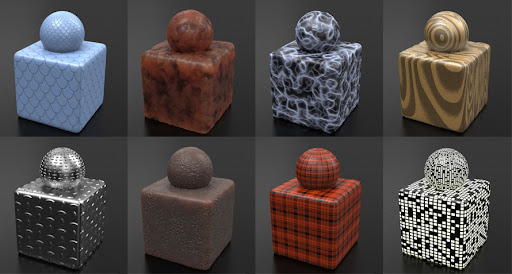
modo 501 includes a large set of Enhance:modo Textures, an extensive library geometric textures, plus organic, noise, panel, process, skin, space tile, water and more. Shown above is a selection of eight of the over 100 Enhance:modo Textures included in modo 501.
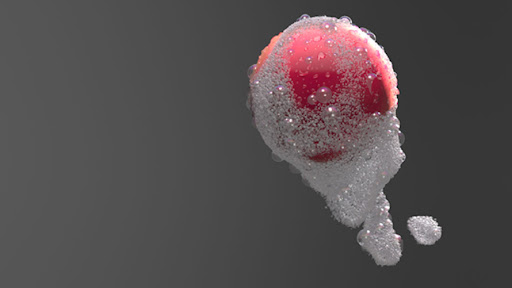
Foam over sphere created by Andy Probst using the Enhance: modo Textures in modo 501.

Jason Bickerstaff created this image using textures from the Enhanced:modo Textures library included in modo 501.
More, more and more!
One the new examples in modo 501 is this simple wheel rig which follows a path and responds to undulating terrain.

This model of teeth by Henning Sanden is included in modo 501.

These tree leaf textures by Chris Hague are part of the extensive set of content included in modo 501.

This model by Hagop Kaneboughazian is included to illustrate the setup of Bokeh Effects in modo 501.

Another file by Hagop Kaneboughazian included in the modo 501 sample content.

Here is an example of a new supplied material in modo 501 called Worn Edges.
 Another model by Philip Lawson included in modo 501.
Here is a forest occlusion material that is useful for creating distant treed landscapes.
Simon van de Lagemaat has provided several different materials that leverage Occlusion shading as part of the content included in modo 501.
This concludes the modo 501 Feature Tour, but there is more to discover.
Your next step is to review the modo 501 Improvements (PDF) document.
TonyWins- User
-
จำนวนข้อความ : 2832
คะแนนความดี : 12840
ชื่อเสียง : 97
วันที่เข้าร่วม : 18/07/2009
อายุ : 51
ที่อยู่ : กรุงเทพฯ -
Re: modo 501 Feature Tour
![]() by bbbigboy Sun 09 Jan 2011, 23:02
by bbbigboy Sun 09 Jan 2011, 23:02
บอกได้คำเดียวว่าสุดยอด....ขอบคุณมากครับผม 
bbbigboy- Core I3

-

จำนวนข้อความ : 69
คะแนนความดี : 583
ชื่อเสียง : 8
วันที่เข้าร่วม : 17/08/2010
อายุ : 42
Re: modo 501 Feature Tour
![]() by TonyWins Mon 10 Jan 2011, 08:52
by TonyWins Mon 10 Jan 2011, 08:52
ดาวน์โหลดได้ที่นี่ครับ Luxology modo 501 Build 40071
TonyWins- User
-
จำนวนข้อความ : 2832
คะแนนความดี : 12840
ชื่อเสียง : 97
วันที่เข้าร่วม : 18/07/2009
อายุ : 51
ที่อยู่ : กรุงเทพฯ -
Re: modo 501 Feature Tour
![]() by HARDZONE Mon 21 Mar 2011, 18:47
by HARDZONE Mon 21 Mar 2011, 18:47
ผมกำลังหัดเล่น เจ้าโปแกรมตัวนี้อยู่ครับมันน่าสนใจมาก เท่าที่รู้มาก อ่า 

HARDZONE- Core I3
-


จำนวนข้อความ : 29
คะแนนความดี : 535
ชื่อเสียง : 3
วันที่เข้าร่วม : 21/03/2011
อายุ : 38
ที่อยู่ : Bangkok Thailand -
Re: modo 501 Feature Tour
![]() by TonyWins Mon 21 Mar 2011, 19:27
by TonyWins Mon 21 Mar 2011, 19:27
HARDZONE พิมพ์ว่า:ผมกำลังหัดเล่น เจ้าโปแกรมตัวนี้อยู่ครับมันน่าสนใจมาก เท่าที่รู้มาก อ่า
มากถึงมากที่สุดเลยครับท่าน
TonyWins- User
-
จำนวนข้อความ : 2832
คะแนนความดี : 12840
ชื่อเสียง : 97
วันที่เข้าร่วม : 18/07/2009
อายุ : 51
ที่อยู่ : กรุงเทพฯ -


revogoko- OP Mouse

-

จำนวนข้อความ : 2
คะแนนความดี : 2
ชื่อเสียง : 0
วันที่เข้าร่วม : 28/11/2015
อายุ : 47
Re: modo 501 Feature Tour
![]() by wasuthan Tue 21 Feb 2017, 19:49
by wasuthan Tue 21 Feb 2017, 19:49
อยากโหลดมาใช้บ้าง โหลดได้จากที่ไหนครับ...(น้ำจิ้มไก่ด้วยนะครับ)
wasuthan- Core I5

-


จำนวนข้อความ : 112
คะแนนความดี : 1120
ชื่อเสียง : 8
วันที่เข้าร่วม : 18/05/2011
อายุ : 55
» วิดีโอตัวอย่างการขึ้นโมเดลอาคารด้วย modo 501 [อัพเดต]
» รบกวนสอบถามหน่อยครับ modo กับ modo Content ต่างกันอย่างไรครับ
» การขึ้นรูปทรงในทิศทางต่างๆ [modo Basic]
» อยากได้คู่มือสอนใช้ modo
» รบกวนขอคู่มือ modo หน่อยครับอยากนำไปศึกษานะครับ
» รบกวนสอบถามหน่อยครับ modo กับ modo Content ต่างกันอย่างไรครับ
» การขึ้นรูปทรงในทิศทางต่างๆ [modo Basic]
» อยากได้คู่มือสอนใช้ modo
» รบกวนขอคู่มือ modo หน่อยครับอยากนำไปศึกษานะครับ
หน้า 1 จาก 1
Permissions in this forum:
คุณไม่สามารถพิมพ์ตอบ|
|
|